Hacking IP cams using ONVIF protocol
Onvif which is a short form of Open Network Video Interface Forum, is an industrial standard for network cameras. However the existing support and documentation is very limited as far as this protocol is concerened. In this module we will try to make a very simple code to know the device name using python and an open source library.
IP cams and Safety
Most of the IP cameras use this protocol but there are is a device specific password which can be modified. There are lots of camera manufacturers which have different set of default ID and Password; the most common one being ‘admin’, ‘admin’. Network cameras are pretty safe for the fact that you have to be on the network and have proper authentication level to access any camera. However, the network security can be dodged, but generally not so easy.
IP Cam Hardware
Depending on the type of camera and it’s power requirement, the hardware changes. But in general, if you are using a good camera with your laptop, you will require a PoE (Power over Ethernet) module, lan cables, laptop and the camera itself. The genral diagram looks like the following:

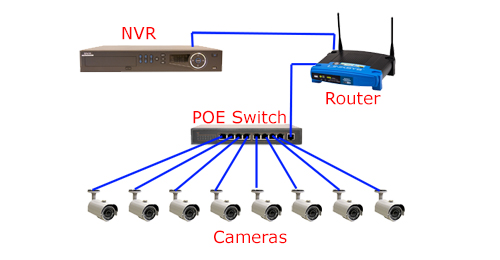
In case you are trying to use several IP cameras at the same time you requrie an NVR (Network Video Recorder) which can record ‘N’ video feeds in parallel. The value ‘N’ varies with different companies. In this case the architecture would look like the following:
Finding the IP address of the Camera(s)
#! /usr/bin/env python
# vim: set fenc=utf8 ts=4 sw=4 et :
#
# Layer 2 network neighbourhood discovery tool
# written by Benedikt Waldvogel (mail at bwaldvogel.de)

from __future__ import absolute_import, division, print_function
import logging
import scapy.config
import scapy.layers.l2
import scapy.route
import socket
import math
import errno

logging.basicConfig(format='%(asctime)s %(levelname)-5s %(message)s', datefmt='%Y-%m-%d %H:%M:%S', level=logging.DEBUG)
logger = logging.getLogger(__name__)


def long2net(arg):
    if (arg <= 0 or arg >= 0xFFFFFFFF):
        raise ValueError("illegal netmask value", hex(arg))
    return 32 - int(round(math.log(0xFFFFFFFF - arg, 2)))


def to_CIDR_notation(bytes_network, bytes_netmask):
    network = scapy.utils.ltoa(bytes_network)
    netmask = long2net(bytes_netmask)
    net = "%s/%s" % (network, netmask)
    if netmask < 16:
        logger.warn("%s is too big. skipping" % net)
        return None

    return net


def scan_and_print_neighbors(net, interface, timeout=1):
    logger.info("arping %s on %s" % (net, interface))
    try:
        ans, unans = scapy.layers.l2.arping(net, iface=interface, timeout=timeout, verbose=True)
        for s, r in ans.res:
            line = r.sprintf("%Ether.src%  %ARP.psrc%")
            try:
                hostname = socket.gethostbyaddr(r.psrc)
                line += " " + hostname[0]
            except socket.herror:
                # failed to resolve
                pass
            logger.info(line)
    except socket.error as e:
        if e.errno == errno.EPERM:     # Operation not permitted
            logger.error("%s. Did you run as root?", e.strerror)
        else:
            raise


if __name__ == "__main__":
    for network, netmask, _, interface, address in scapy.config.conf.route.routes:

        # skip loopback network and default gw
        if network == 0 or interface == 'lo' or address == '127.0.0.1' or address == '0.0.0.0':
            continue

        if netmask <= 0 or netmask == 0xFFFFFFFF:
            continue

        net = to_CIDR_notation(network, netmask)

        if interface != scapy.config.conf.iface:
            # see http://trac.secdev.org/scapy/ticket/537
            logger.warn("skipping %s because scapy currently doesn't support arping on non-primary network interfaces", net)
            continue

        if net:
            scan_and_print_neighbors(net, interface)
Note: This is an opensource code that we adapt,written by Benedikt Waldvogel original repo, there are other methods as well that you can employ to find the IPs on your network but this suffices everything.
Important Note: You need to run this as root. This code will return results like the following:
2017-06-21 11:30:04 INFO  24:a4:3c:06:6d:2d  192.168.2.1
2017-06-21 11:30:04 INFO  20:89:84:e9:61:63  192.168.2.25
2017-06-21 11:30:04 INFO  30:b5:c2:4f:a7:6e  192.168.2.45
2017-06-21 11:30:04 INFO  70:5a:0f:26:ae:c4  192.168.2.40
2017-06-21 11:30:04 INFO  60:e7:8a:00:04:28  192.168.2.52
2017-06-21 11:30:04 INFO  18:03:73:b4:94:8a  192.168.2.71
2017-06-21 11:30:04 INFO  00:1b:2f:72:09:1c  192.168.2.70
2017-06-21 11:30:04 INFO  00:22:6d:1f:ff:41  192.168.2.89
2017-06-21 11:30:04 INFO  00:07:5f:96:08:e6  192.168.2.91
2017-06-21 11:30:04 INFO  2c:4d:54:d7:9f:a8  192.168.2.90
2017-06-21 11:30:04 INFO  e8:94:f6:eb:ed:55  192.168.2.41
2017-06-21 11:30:04 INFO  00:e0:70:53:5f:c0  192.168.2.105
2017-06-21 11:30:04 INFO  60:45:cb:60:99:dc  192.168.2.115
2017-06-21 11:30:04 INFO  6c:72:20:15:89:07  192.168.2.130
2017-06-21 11:30:04 INFO  9c:eb:e8:2e:92:bb  192.168.2.135
2017-06-21 11:30:04 INFO  d4:81:d7:84:fd:00  192.168.2.142
2017-06-21 11:30:04 INFO  2c:4d:54:d7:a0:0e  192.168.2.143
2017-06-21 11:30:04 INFO  98:90:96:c7:ed:b3  192.168.2.152
2017-06-21 11:30:04 INFO  58:20:b1:7d:b9:14  192.168.2.185
2017-06-21 11:30:04 INFO  1c:1b:0d:46:3e:93  192.168.2.192
2017-06-21 11:30:04 INFO  00:50:b6:87:e5:3d  192.168.2.194
2017-06-21 11:30:04 INFO  9c:5c:8e:8c:31:00  192.168.2.200
2017-06-21 11:30:04 INFO  6c:72:20:15:8a:97  192.168.2.204
2017-06-21 11:30:04 INFO  c0:56:27:2e:39:32  192.168.2.205
2017-06-21 11:30:04 INFO  f0:de:f1:ed:82:50  192.168.2.212
2017-06-21 11:30:04 INFO  1c:87:2c:6c:25:e0  192.168.2.20
2017-06-21 11:30:04 INFO  38:d5:47:08:87:80  192.168.2.218
2017-06-21 11:30:04 INFO  44:03:a7:1d:d4:6c  192.168.2.151
2017-06-21 11:30:04 INFO  38:2c:4a:4a:3d:50  192.168.2.225
2017-06-21 11:30:04 INFO  78:54:2e:97:37:56  192.168.2.227
2017-06-21 11:30:04 INFO  80:fa:5b:39:96:47  192.168.2.237
2017-06-21 11:30:04 INFO  14:07:08:10:0a:fc  192.168.2.250
The Mac ID is generally written on the back of your camera. In my case it’s 14:07:08:10:0a:fc and hence I deduce that the IP of my camera is 192.168.2.250:
2017-06-21 11:30:04 INFO 14:07:08:10:0a:fc 192.168.2.250
Installing Onvif and getting the Device Name
Enter the following set of commands to install Onvif
$ sudo pip install onvif
$ git clone https://github.com/quatanium/python-onvif.git
$ cd python-onvif && python setup.py install
This would install everything required. To know the device we write the following script:
from onvif import ONVIFCamera
mycam = ONVIFCamera('192.168.0.2', 80, 'user', 'passwd', '/etc/onvif/wsdl/')

# Get Hostname
resp = mycam.devicemgmt.GetHostname()
print 'My camera`s hostname: ' + str(resp.Name)

# Get system date and time
dt = mycam.devicemgmt.GetSystemDateAndTime()
tz = dt.TimeZone
year = dt.UTCDateTime.Date.Year
hour = dt.UTCDateTime.Time.Hour
What Next?
You can go on and take a snapshot or record a video using this. The complete set of examples are in the repo python-onvif. If you get a good know-how of the system, you can go on and design your own Video Management System.